Pages

Showing posts with label DIY. Show all posts

Wednesday, December 19, 2012

Pom-Pom Hat Pattern


I have a serious case of knitter's disease. When I see a factory-knit garment, I simply can't bring myself to buy it. No no, I have to examine it, dissect it, and make my own version. Naturally, when I saw this Anthropologie Pom Beanie, my first thought was: "Thick yarn? All garter stitch and a big ol' pom-pom? I can make that!" And the only thing better than making one for myself, is sharing my pattern with you!


These hats are so fast and easy to whip out, there's still plenty of time to make a few for the fashionably-inclined women in your life. Just put on your favorite Christmas movie (Elf? Scrooged? Christmas Vacation?) and you'll be about finished by the time it's over. I wanted to make it beginner friendly as well, so this hat is knit flat- no knowledge of circular or double-pointed needles necessary (though, of course, you can easily join it and knit in the round, if you'd prefer).

So here's a little Christmas present from me to you. Click here to download the free PDF.

Hope you enjoy it!


Photos by Michael Hudson for Is + Was

P.S. Please feel free to comment if you find anything confusing in the pattern. I want to make it as easy-breezy as possible!


Pin It Now!

Tuesday, December 11, 2012

DIY Christmas Village


For as long as I can remember, my mom has had a traditional, ceramic Christmas village that we set up on the mantle each year. Long before I probably should have been handling fragile miniatures, I was entrusted with the task of unwrapping each tiny house, and deciding the layout of that year's Christmas village. Sometimes the church and the itty-bitty carolers were front and center; more often, as I got older and snarkier, it was the public house or the inn that the other buildings were clustered around. Either way, it never felt like the holiday season had truly begun until the village was twinkling on the mantle.

This year, I decided it was time to start some new traditions- complete with my very own Christmas village. I wanted mine to be a little more modern, a little more colorful, and, of course, DIY-able.


I'm so happy with how it turned out! It reminds me of a quaint little French village...though, with the color scheme, maybe it's more like a quaint Miami village. Here's the scoop, if you'd like to make your own:

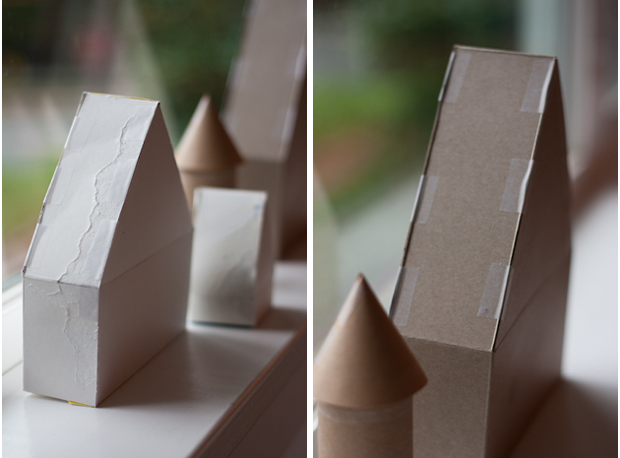
I primarily used this tutorial for the houses, and this one for the trees, but I made a few modifications to make my life easier.

For the houses:

- First, I used tape almost exclusively to construct the houses. I find glue to be a fickle mistress, and I was getting so frustrated with attempting to get all my little folded edges to fit perfectly and then stay in place while the glue was drying, that at one point I actually King Kong-stomped one of my houses. Yep. Full-on temper tantrum. Once I discovered that I could forgo all the folding and tucking and gluing and just tape the damn things together, I ran around the house gleefully dumping things from their boxes and stealing the centers out of our toilet paper rolls in my haste to make more houses. Yes, you can see the tape a little bit in the finished product, but it really doesn't detract from the effect at all, and it made the project so much less fussy.

- For the towers, or silos as I like to think of them, I simply made little cone shapes out of Kraft paper for the roof, and glued them on top of toilet paper rolls (yes, I deigned to use glue).

- If you want your village to be lit at night, just cut small holes in the bottom of your houses for the lights, and make little "windows" in front for the light to shine out of. Ultimately, I decided I liked mine just the way it was, and left the twinkling to the Christmas tree.


For the trees:

- I used these plastic cones (found at my local Joann's), rather than styrofoam, then cut them down to my desired heights. My trees are about 6, 8, and 10 inches tall.

- I opted to use tacky glue for the entire process, rather than a hot-glue gun. Initially I did this because I was afraid the hot glue would melt the plastic cones, but now that I've gone through the process, I would recommend avoiding hot glue, even if you're using styrofoam cones instead of plastic. It's a bit of a squidgy process (you're trying to wrap straight pieces of felt around something conical, so it's not an exact science), and I often did a fair amount of adjusting with my fingers before I got the strip to lay just right. Had I been using a hot glue gun, I suspect I would have gotten burned. A lot.

- Though it's not called out in the instructions, don't forget to measure the circumference at the base of your trees to determine how long to make your longest pieces of felt.


Pin It Now!

Monday, December 3, 2012

Party-In-A-Box


Here's something you should know about me: I love love love surprises, and (surprise!) I love presents. I'll never complain about getting one, but I get a special thrill out of giving them- especially in creatively wrapped packages. As the holiday season approaches, I've been thinking about what to gift my loved ones, and I keep coming back to experiences, rather than things- tickets to a show, a gift certificate to a favorite restaurant, a day of shopping, etc. The problem is, experiences don't make very interesting packages.

Enter the party-in-a-box.

For his birthday last winter, I decided to give Michael a bunch of gift certificates to schmancy restaurants and other fun things for us to do together. I knew he would really enjoy the gift, but it seemed a little anti-climactic to just hand him an envelope, so I devised a slightly more interesting presentation:


 Put the gift certificates in a giant box, and fill it with tissue paper, confetti, and balloons!


I wrote on my balloons with a Sharpie (one said: "Date Night 2012" and the other said "Upgrade Package"), but if you wanted to step it up a notch, you could order customized balloons.

I also thought you might enjoy something a little more glamorous than a handwritten note on a piece of card stock, so I made you a free printable. Click here to download it.


Bonus points for re-purposing an adorable box from Fab.


Pro tip: If you don't have confetti laying around (who does?) you can make some by cutting up little pieces of wrapping paper ribbon, as I did above. Available materials for the win!


Pin It Now!

Wednesday, October 24, 2012

DIY Herringbone Mug

Image from Wit & Whistle

I just discovered Amanda Wright's blog, Wit & Whistle, and I'm in love! So many sweet projects, recipes, and beautiful design photos. This handmade herringbone mug just shot to the top of my DIY to-do list. Check out the full tutorial here, on her blog.


Pin It Now!

Monday, October 1, 2012

Charlie Chaplin Wall Art

Image from Trendenser, found via A Merry Mishap

I love this simple and brilliant DIY wall art idea from Trendenser. I'm thinking crumpled kraft paper (or even grocery bags), black felt, and a basic Ikea frame. Who's with me?

Pin It Now!

Wednesday, September 19, 2012

DIY Nautical Rope Necklace


I was super inspired by this gorgeous J.Crew Hyacinth necklace, but I wasn't so thrilled about the $150 price tag, so I decided to make my own version! All that's required is some basic knowledge of crochet (really basic, I promise), and a few materials, and you can make one too. If you don't want to make one yourself, these will also be available in my shop very soon.

Here's what you'll need:

- 1 cone of #18 Nylon Mason Line (you should be able to find it in any hardware store, including right here at Home Depot). You can also use any string/twine/rope of your choosing (I made a few necklaces with this stuff, which is much heavier weight than the mason line). Just remember: the thicker your cord, the larger your necklace will be, so adjust the number of stitches if necessary.

- A size N 9mm crochet hook

- Heavy, gold plated chain (about 12" per necklace)

- 4 jump rings (I used 10mm gold plated)

- 1 lobster clasp

- A tapestry needle

- Needle nose pliers


This pattern uses several very basic crochet stitches: a single crochet, a half double, a double, and a triple. They're not scary, and if you can do one, you can do them all (the only real difference is the number of times you wrap the yarn over and pull up loops. The technique is the same for all of them). There are tons of great illustrated and video tutorials around the web, but here's a place to start.

Prepare your materials: we're going to use three strands of mason line held together, so you'll need to be able to pull from three separate sources. The easiest way I found was to wind some onto pieces of cardboard to make little bobbins, but you can also just wind it around your fingers and make a small ball.

Step 1: Make your foundation chain


Holding all three strands of mason line together, make a slipknot, leaving several inches of tail to weave in later. Chain 16.

Step 2: Your first row


Skip the 1st stitch, then single crochet in the next 2 stitches. Double crochet in the next 4 stitches. You can already see the crescent shape emerging...

Step 3: Mirror image


Triple crochet in the next 3 stitches. Now you're just going to mirror what you did in step 2: double crochet in the next 4 stitches, then single crochet in the last 2. At this point, your necklace should look like the picture above, in the lower left corner. Chain 1 stitch and turn.

Step 4: Your last row

Your last row will be exactly like your first, but instead of using double and triple crochets, you'll use half double and double. So: single crochet in the first 2 stitches, half double in the next 4. Now you'll double crochet the middle 3 stitches, half double in the next 4, and single in the last 2 stitches.

Cut your string, leaving several inches of tail to weave in. Weave in the tails using your tapestry needle. If you're concerned about them coming loose, you can dab a little superglue on the end, but it's never been a problem for me. Once the ends are woven in, it will look like this:


Step 5: Attach the hardware


Detach two 6-inch pieces of chain from your spool or strand. Open two of the jump rings with pliers and slip one into each end of your crocheted crescent. Slip chain onto jump ring, then close ring with pliers. Repeat on other side. Attach the other two jump rings to the ends of the chain, slipping your lobster clasp onto one of the jump rings. Close with pliers.

The crescent will be quite malleable, so you can manipulate it into more of a u-shape if you'd like.


Aaand...voila! You're done.


Photos by Michael Hudson for Is + Was

Note: this pattern is for personal use only. Please don't sell the finished product.

Pin It Now!