Pages

Showing posts with label holidays. Show all posts

Friday, December 21, 2012

Merry Christmas To All...


Dear friends,

I'm so ready to spend the next few days snuggled up with my family, but I thought I'd leave you with one more easy, last-minute decorating idea: cranberries! I like to scatter them in the base of candle holders, and in little white teacups with tall tapers stuck in the middle- so simple, and so festive. Whatever you celebrate, or don't celebrate, at this time of year (I call it "Christhannukawanzaastice"), I hope you are warm and safe, and surrounded by good food and good friends!


xo,

Jessica


Pin It Now!

Thursday, December 13, 2012

One Rainy Wish

Tatine Tisane Candle, found here.

I am not ordinarily in favor of perfumed things. In fact, I am so averse to heavy perfumes that I become filled with rage in movie theaters and restaurants where I am inundated with people's heavy-handed scent application, and I have to restrain myself from standing up and shouting: "Do you realize you are impacting everyone within a 50-foot radius?!!" So, needless to say, I was surprised when I was taken in by a scented candle.

These are not sickly sweet, apples 'n cinnamon candles. They are subtle and delightful in both scent and name (One Rainy Wish, Swarm of Bees, Kensington Gardens). They smell of rain, and grass, and high school boyfriends, and would make a delightful stocking-stuffer. Just in case you were on the hunt. :)


Pin It Now!

Tuesday, December 11, 2012

DIY Christmas Village


For as long as I can remember, my mom has had a traditional, ceramic Christmas village that we set up on the mantle each year. Long before I probably should have been handling fragile miniatures, I was entrusted with the task of unwrapping each tiny house, and deciding the layout of that year's Christmas village. Sometimes the church and the itty-bitty carolers were front and center; more often, as I got older and snarkier, it was the public house or the inn that the other buildings were clustered around. Either way, it never felt like the holiday season had truly begun until the village was twinkling on the mantle.

This year, I decided it was time to start some new traditions- complete with my very own Christmas village. I wanted mine to be a little more modern, a little more colorful, and, of course, DIY-able.


I'm so happy with how it turned out! It reminds me of a quaint little French village...though, with the color scheme, maybe it's more like a quaint Miami village. Here's the scoop, if you'd like to make your own:

I primarily used this tutorial for the houses, and this one for the trees, but I made a few modifications to make my life easier.

For the houses:

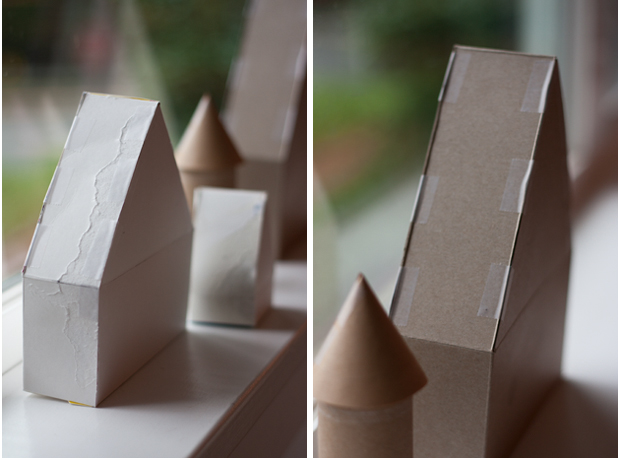
- First, I used tape almost exclusively to construct the houses. I find glue to be a fickle mistress, and I was getting so frustrated with attempting to get all my little folded edges to fit perfectly and then stay in place while the glue was drying, that at one point I actually King Kong-stomped one of my houses. Yep. Full-on temper tantrum. Once I discovered that I could forgo all the folding and tucking and gluing and just tape the damn things together, I ran around the house gleefully dumping things from their boxes and stealing the centers out of our toilet paper rolls in my haste to make more houses. Yes, you can see the tape a little bit in the finished product, but it really doesn't detract from the effect at all, and it made the project so much less fussy.

- For the towers, or silos as I like to think of them, I simply made little cone shapes out of Kraft paper for the roof, and glued them on top of toilet paper rolls (yes, I deigned to use glue).

- If you want your village to be lit at night, just cut small holes in the bottom of your houses for the lights, and make little "windows" in front for the light to shine out of. Ultimately, I decided I liked mine just the way it was, and left the twinkling to the Christmas tree.


For the trees:

- I used these plastic cones (found at my local Joann's), rather than styrofoam, then cut them down to my desired heights. My trees are about 6, 8, and 10 inches tall.

- I opted to use tacky glue for the entire process, rather than a hot-glue gun. Initially I did this because I was afraid the hot glue would melt the plastic cones, but now that I've gone through the process, I would recommend avoiding hot glue, even if you're using styrofoam cones instead of plastic. It's a bit of a squidgy process (you're trying to wrap straight pieces of felt around something conical, so it's not an exact science), and I often did a fair amount of adjusting with my fingers before I got the strip to lay just right. Had I been using a hot glue gun, I suspect I would have gotten burned. A lot.

- Though it's not called out in the instructions, don't forget to measure the circumference at the base of your trees to determine how long to make your longest pieces of felt.


Pin It Now!

Monday, December 3, 2012

Party-In-A-Box


Here's something you should know about me: I love love love surprises, and (surprise!) I love presents. I'll never complain about getting one, but I get a special thrill out of giving them- especially in creatively wrapped packages. As the holiday season approaches, I've been thinking about what to gift my loved ones, and I keep coming back to experiences, rather than things- tickets to a show, a gift certificate to a favorite restaurant, a day of shopping, etc. The problem is, experiences don't make very interesting packages.

Enter the party-in-a-box.

For his birthday last winter, I decided to give Michael a bunch of gift certificates to schmancy restaurants and other fun things for us to do together. I knew he would really enjoy the gift, but it seemed a little anti-climactic to just hand him an envelope, so I devised a slightly more interesting presentation:


 Put the gift certificates in a giant box, and fill it with tissue paper, confetti, and balloons!


I wrote on my balloons with a Sharpie (one said: "Date Night 2012" and the other said "Upgrade Package"), but if you wanted to step it up a notch, you could order customized balloons.

I also thought you might enjoy something a little more glamorous than a handwritten note on a piece of card stock, so I made you a free printable. Click here to download it.


Bonus points for re-purposing an adorable box from Fab.


Pro tip: If you don't have confetti laying around (who does?) you can make some by cutting up little pieces of wrapping paper ribbon, as I did above. Available materials for the win!


Pin It Now!

Tuesday, November 20, 2012

Happy Thanksgiving


Happy happy Thanksgiving, dear friends! I'm going to sign out early this week to enjoy some much-needed time with my loved ones...and, of course, to eat a completely unreasonable amount of food. I hope your holiday is warm, lovely, and plentiful. xo, Jessica

P.S. For those of you who like to nerd out on Thanksgiving food as much as I do, I'm including my menu below. I'm attempting to "take it easy" this year- i.e. pare down the menu to the essential favorites, and spend more time enjoying my family and less time in front of the stove.


Thanksgiving 2012


Mashed Potatoes with Caramelized Onion Gravy


Braided Onion Bread 
(I promise I'll share this recipe soon. It might be my favorite thing on the Thanksgiving table...and it definitely should be made more than once a year.)

Mystery Brussel Sprout Dish, brought by a friend
(I'm hoping maybe it's something like this. But, really, I'll take brussels however I can get them.)

Cranberry-Peach Compote
(I'll share this one soon too.)

Deepest Dish Apple Pie
(From the new Smitten Kitchen Cookbook. I've taken to calling it "Mile High Apple Pie." Has a nice ring, don't you think?)

Hot Apple Cider


Pin It Now!

Monday, November 12, 2012

Tradition


There seem to be two distinct camps regarding acceptable holiday food protocol: those who believe that tradition is sacred and would prefer to eat the familiar Thanksgiving menu they grew up with, and those who like to experiment with new dishes every year. The staunchly traditional bunch seem to be a lot more prevalent and a lot more vocal.

I'm pretty sure I fall in the second category. I love family traditions and, yes, there are a handful of holiday foods that I look forward to all year and wouldn't dream of ousting (Mom's braided onion bread anyone?), but I also recognize that much of my cooking pleasure derives from trying new things- new processes, new flavor combinations, the ever-present thrill of possible failure... The risks certainly increase when experimenting with unfamiliar dishes, but so do the chances of stumbling your way into food nirvana.

So, what do you think? Is it wise to experiment with your Thanksgiving menu on an already high-stress cooking day, or are you better off sticking to well-vetted standbys? I'd love to hear your thoughts!

P.S. The heavenly dessert pictured above is this pumpkin cheesecake with gingersnap crust that I discovered several years ago when we decided to buck the traditional pumpkin pie. Now the cheesecake has become our new tradition. A perfect example of experimentation being oh-so worth it...


Pin It Now!

Tuesday, July 3, 2012

Flag Cake


I realize this is only my fourth post on this blog, but I think I may have to retire after this one. I've outdone myself. Peaked too soon. This cake is officially the coolest thing I've ever made.

In all seriousness, this project was a major motivator for starting my blog before the 4th of July. I actually made it last year, and there was
no way I was waiting another year to share it with you! (For the record, I think I'm gonna cut myself a break this year and make something a little lower maintenance, like this.)

I won't pretend it isn't a serious undertaking, but if you've got it in you, 
make a flag cake!! It is such a fun project, and the delighted, awestruck looks on the faces of family and friends when you cut it open are well worth the effort.


These crumbs remind me of fireworks!


Here's the lowdown:

  • I followed these instructions, pretty much to the letter, except I opted to use this basic vanilla cake recipe instead of a boxed mix (you know, because this project wasn't time consuming enough already). In order to make the day-of as relaxed and easy as possible, I made the cake layers ahead of time and froze them, so all I had to do in the morning was assemble and frost!
  • I used this "seven minute frosting" recipe, which holds up really well in the heat and tastes deliciously like marshmallows (though it invariably takes more than seven minutes to come together).
  • I strongly recommend using a gel food coloring to get those super-saturated colors without overwhelming your batter with liquid.
  • The cake bunting is made from triangles I cut out of scrap fabric, sewed together, and tied to two wooden skewers (if you look closely at the bunting and my outfit, you might see some familiar fabric...). If you're not sewing-inclined, here's one on Etsy that's very similar to mine.


If you're going to go all-out-crazy-patriotic with the dessert, you might as well look the part.


Now add a beautiful day, and a mean game of croquet...


friends and family...


and you've got a recipe for a blissful day.


Pin It Now!